When an assignment is completed, you'll need to take a high quality photograph of your artwork, then turn in the image as your assignment through Google Classroom.
Here are some tips:
Turn In the Photograph
Turning in Your Work in Google Classroom
After you have scanned or photographed each artwork you complete in this class, please turn in each assignment via Google Classroom. To do that:
1. Go to classroom.google.com.
2. Click the class and then click the assignment.
3. Attach your file.
Next to Add, click the Down arrow, and then Drive, Link, or File Attach.
Select the attachment.
4. Click Add.
**Note: You can attach or create more than one file.**
5. (Optional) To remove an attachment, click Remove.
6. (Optional) Add a private comment to your teacher and click Post.
7. Click Turn In and confirm.
Here are some tips:
- Use the best camera you have (iPad, phone, or classroom/teacher's camera)
- The artwork should be neat, not folded or damaged
- Hang the art on a flat wall or place on an easel
- Set up art with light that is consistent and equal over the entire work of art (No shadows)
- Take a few pictures of the same artwork
- Upload your photo(s) onto the computer, then delete the images from the camera roll.
- Check your pictures and select the most accurate one
- Use a photo editing application to crop and edit your work.
Turn In the Photograph
- Name the file with the name of the assignment
- Place the picture into your drive folder for this class (Create a folder for this class if you have not already).
- Go to Google Classroom and turn in your assignment
Turning in Your Work in Google Classroom
After you have scanned or photographed each artwork you complete in this class, please turn in each assignment via Google Classroom. To do that:
1. Go to classroom.google.com.
2. Click the class and then click the assignment.
3. Attach your file.
Next to Add, click the Down arrow, and then Drive, Link, or File Attach.
Select the attachment.
4. Click Add.
**Note: You can attach or create more than one file.**
5. (Optional) To remove an attachment, click Remove.
6. (Optional) Add a private comment to your teacher and click Post.
7. Click Turn In and confirm.
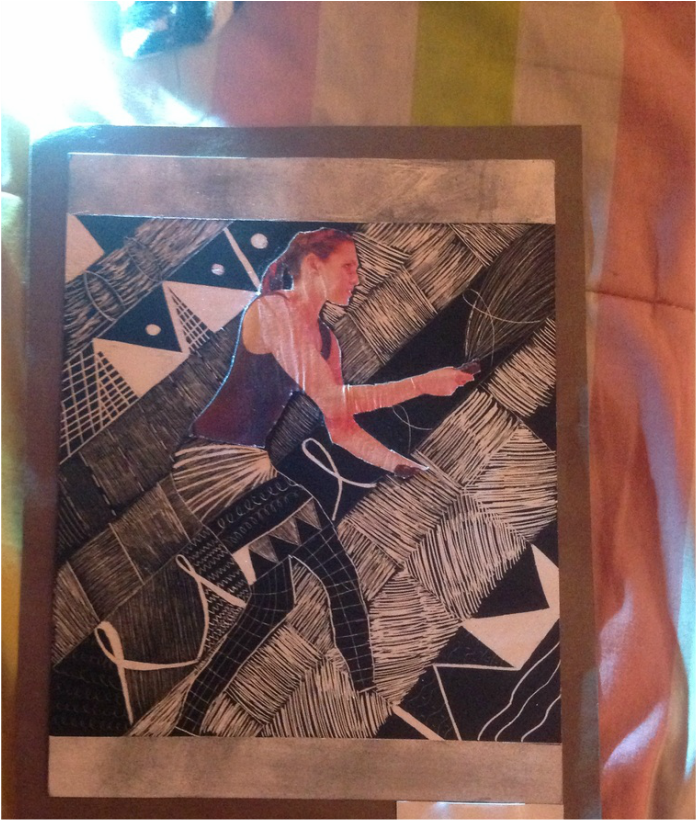
DON'T turn in a photo like the one below. It's crooked. There are light glares. The image is a little blurry and somewhat hard to see. There is a lot of excess around the artwork.
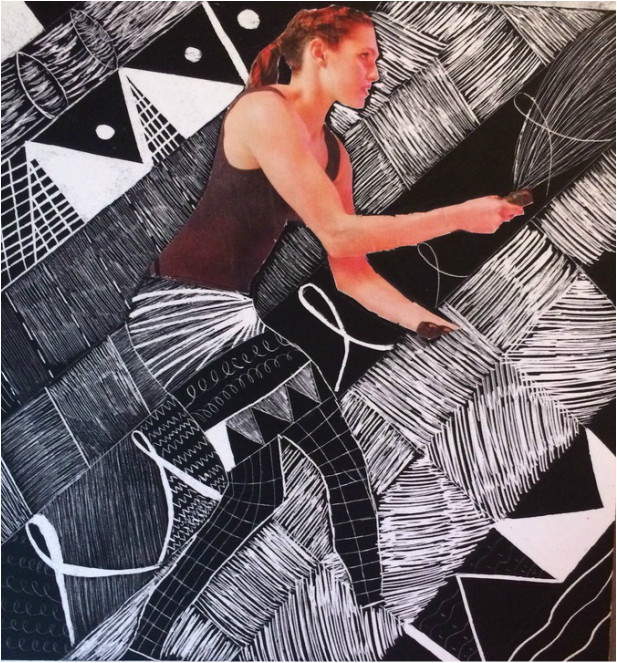
The image below was edited in a photo editing application. If you set up the photograph well to begin with, you may be able to skip this step. Compare it to the photo above. Notice how much cleaner and clearer it is.
FYI: An alternative to taking a photograph is to scan your artwork, if your artwork is the same size of smaller than your scanning bed. The Design classroom 215 also has a larger format scanner that will scan sketchbook size (11 x 14") artwork.
 RSS Feed
